
Creating Mosaics with AstroDrizzle#
While not strictly necessary, you may find it useful to generate a mosaic of all of the HST observations for a galaxy, creating a single image of the full galaxy from the combined individual observations.
For example, the galaxy M81 has over 27 unique HST fields, not all of which have enough X-ray sources within them that could be used for an astrometric correction (see Astrometric Corrections). For that reason, I found it useful to combine all of the fields into a single mosaic, so that I could perform an astrometric correction on the entire image using what few reference objects there were. Even if you don’t need a full mosaic, you should still try to align all of your fields to one another with tweakreg, as this will reduce headaches down the line.
Note about memory management and DrizzlePac#
Creating a mosaic is usually a very time-consuming process that requires a lot of trial and error. The best resource is the official DrizzlePac notebook[1]:
https://spacetelescope.github.io/hst_notebooks/notebooks/DrizzlePac/align_mosaics/align_mosaics.html
You can also view the full documentation here: https://app.readthedocs.org/projects/drizzlepac/downloads/pdf/latest/
Because this process takes up a lot of memory, it is best you run these steps through command line python rather than an iPython notebook, which will more than likely time out and crash. If you use command line python, you may want to monitor its memory usage with the Activity Monitor app to ensure no single step is taking too many resources and causing the kernel to crash.
If running Drizzlepac through the command line is still causing too many issues with your machine, then you may need to run it out of SciServer, a site that provides free storage and computing resources for heavy-duty code: https://apps.sciserver.org/
Keep in mind, you will have to reinstall the packages you need (such as drizzlepac) within SciServer and will probably need to run the code through a SciServer command line terminal to keep it from crashing. See Getting Started for the list of packages you will need. It might be a good idea to set up stenv on SciServer as well.
Downloading HST Observations with astroquery#
Regardless of whether you decided to manually find HST images or via pyVO, in order to align and combine your images, you will need to download the appropriate calibration files. Drizzlepac requires FLC files, which are charge transfer efficiency (CTE) corrected. I’ve tested this code with DRZ files (which are pre-drizzled), but unfortunately I could not get those to align and mosaic, so for now, FLC files are the way to go.
To find the appropriate files, query MAST/HST with astroquery. This part can be done in an iPython notebook, if you prefer.
from astroquery.mast import Observations

print("Finding observations for ACS/WFC images...")
obs_table = Observations.query_criteria(objectname="M101", obs_collection="HST",
                                        filters=["F435W", "F555W", "F814W"],
                                        proposal_id=[9490], instrument_name="ACS/WFC")
print("Done")
You don’t strictly need to know the proposal ID for astroquery to find HST images, but it can help narrow down the download to specific images. Here, I used the information I gathered when selecting the images I wanted with pyVO (which is saved under the header ObsID). Alternatively, if you leave proposal_id blank, then astroquery will pull all available data, which one may find either beneficial or detrimental depending on individual needs.
Note
The parameters filters, proposal_id, and instrument_name in the code above can be taken directly from the HLA under the headers Spectral_Elt, PropID, and Detector, respectively. It’s a really good idea to visit the HLA or MAST database prior to running the code above to find this information for the images you want to use, if you want to narrow the query results down to just those you know are useful to you!
After querying the observations, download the resulting datafiles. Don’t be alarmed if it tells you it’s downloading thousands of files; in actuality, it will only download as many files as is listed in obs_table above. However, if the program seems to get stuck on a particular download (meaning it takes more than 5 minutes for a single file), you may need to rerun it to make sure it hasn’t glitched.
print("Downloading data.\n This may take several minutes... \n")
products = Observations.get_product_list(obs_table)
data_prod = ['FLC']       # other options are ['FLT','DRC','DRZ']
data_type = ['HAP-SVM']   # other options are ['CALACS','CALWF3','CALWP2']

Observations.download_products(products, project=data_type,
                               productSubGroupDescription=data_prod)
print("Done")
Note
MAST also contains what are called ‘HAP-MVM’ files, where MVM refers to multi-visit mosaics as opposed to SVM, single-visit mosaics. According to STScI, these are susceptible to photometric and alignment errors, so they are likely not appropriate for our purposes.
Note
Alternatively, if you’re worried about astroquery finding and downloading too many files that you don’t need, you can select and download the FLC files from MAST directly. After selecting and adding the fields you want to your cart, open the Download Manager and under Filters, deselect “Minimum Recommended Products”, select “SCIENCE”, and select FLC. These can then be downloaded as normal.
Finally, clean up the downloaded directories by pulling the appropriate files and moving them to the main working directory:
import shutil
import glob
import os

# Gathering the FLC file names
input_flcs = glob.glob(os.path.join('mastDownload','HST','*','*.fits'))

# Moving files from mastDownload directory into current directory
for flc in input_flcs:
  shutil.copy(flc, os.path.basename(flc))

shutil.rmtree('mastDownload') # removes the extra directories
print("Done")
Occasionally you’ll encounter an empty FITS file, which will raise an error during the drizzling step:
ValueError: Input file '<filename>' is neither a GEIS file nor a FITS file
(see Errors and How to Fix Them). As far as I can tell, this may happen if the file isn’t downloaded properly. You can tell which files are bad by attempting to open them:
from astropy.io import fits

# The filename format searched below will need to be changed based on the
# names of the files downloaded above
flc_files = glob.glob("hst*_acs_wfc_*_j*_flc.fits")
flc_files.sort()       # Alphabetizing files

for i,f in enumerate(flc_files):
    try: hdu = fits.open(f)
    except: print(f,"not good. Please remove.")
You can then delete any bad files (such as with os.remove(f)) and redownload them either through the astroquery or manually through the MAST/HST website[2]. When selecting files through this portal, you’ll want to uncheck the Minimum Recommended Products box and check the FLC box under Groups in My Downloads Basket. Beware: if you choose to skip bad files rather than redownload them, you may end up with some messy images, as drizzling observations will stack them to create a cleaner image sans cosmic rays.
Creating a First Pass Mosaic#
Before attempting to change the alignment of the individual HST fields that were downloaded by astroquery, it’s a good idea to inspect the current alignment to see where things can be improved, or if a realignment is even needed! This can be done by creating a test mosaic with AstroDrizzle. This should be done in command line python, as an iPython notebook is likely to crash!
Open python in the proper conda environment and run AstroDrizzle[1] on each filter to create a first pass mosaic. For example:
from drizzlepac.astrodrizzle import AstroDrizzle as adriz

# Pulling the F555W (green) FLC files downloaded from astroquery
flc_files = glob.glob("*f555w*flc*.fits")
flc_files.sort()

adriz(flc_files, output='testing_mosaic_f555w',
      preserve=True, clean=True, context=False,
      skymethod='globalmin+match', # renormalizes the brightness of each field
      driz_cr=True, driz_cr_corr=False,
      final_wcs=True, final_rot=0,  # places North pointed up
      configobj=None, overwrite=False, build=False)
The code above will save a backup of all of the original .FITS files for a particular filter to a directory called OrIg_files, apply a background normalization and cosmic ray correction to each field, and stitch the fields together into a mosaic. Inspect both the fields with respect to one another in a single filter, and each filter with respect to each other filter. You may find that most things are well-aligned, though regardless the different colors will likely need to be aligned to one another to obtain a proper full-color image.
If at this point you notice some major streaks or blurring in the image, this may indicate that some of the data files include bad observations that should be removed from your list of FLC files. See Visually inspect the FITS files below for instructions on how to correct this.
Note
I sometimes notice that the cosmic ray correction leaves black holes at the center of some particularly bright stars that the algorithm mistakes for cosmic rays. To fix this, you can adjust the driz_cr_snr parameter. The default is driz_cr_snr = "3.5 3.0". Higher numbers (e.g. driz_cr_snr = "20.0 18.0") will make the cosmic ray correction more stringent.
Creating a Reference Source Catalog#
DrizzlePac works by aligning 2 HST images based on the positions of stars that these images have in common. For this to work efficiently, the code requires the input of a reference source catalog. There are several ways to make or obtain a catalog, which will be discussed here.
Creating a catalog from the first pass mosaic#
The best catalog is one that provides reference stars spanning all fields of interest, and the simplest way to ensure your catalog meets that criterion is by creating a catalog from the mosaic created above as long as the alignment looks good. This only needs to be done in one of the filters and can be accomplished using DAOStarFinder in photutils.detection:
from astropy.io import fits
from astropy.stats import sigma_clipped_stats
from photutils.detection import DAOStarFinder

fwhm = 0.3        # in arcseconds, from DS9
pixtoarcs = 0.05  # arcsec/pix, for ACS/WFC
data = fits.getdata('testing_mosaic_f555w_drc_sci.fits')

# Threshold is usually based on the st. dev. of the data,
# which can be obtained thus:
dat_mean, dat_med, dat_std = sigma_clipped_stats(data, sigma=5)

# Pulling sources using DAOStarFind
daofind = DAOStarFinder(fwhm=fwhm/pixtoarcs, threshold=5*dat_std)
objects = daofind(data)
objects.write('mosaic_catalog.csv')
This will save a file in which the coordinates of each identified source will be saved in image (pixel) units in columns 1-2. In this case, you will use the file from which the catalog was generated as your reference image, refimage, and read in this catalog in the catalog parameter of tweakreg.
Note
It isn’t clear to me why this particular method requires catalog instead of refcat, as the other methods seem to require the catalogs be read in as refcat. If one parameter doesn’t work, try reading your catalog in using the other.
Downloading catalogs from MAST#
Another solution to catalog creation may be to download them straight from MAST. Catalogs from MAST are associated with a single field, so you would have to download several and combine them if you wanted to ensure the stars in the catalog span all fields in the final mosaic. These catalogs are accessed through the MAST download portal; when you add an image to your basket, one of the files nested within the MAST/HST directories will be an .ecsv file containing the coordinates of point sources.
If you choose this catalog creation method, then you will need to read the catalog in as refcat and use the parameters refxcol=3, refycol=4 in tweakreg to point the algorithm to the columns where the star coordinates are stored. You should try running this without defining refimage, but if that doesn’t work, then you will need to find the image the catalog is built on and read it in as refimage.
Using the Gaia catalog#
DrizzlePac tutorials typically use the Gaia catalog in their examples, although I’ve found they don’t always supply a good number of sources for extragalactic studies like I use in my work. Nevertheless, a catalog of stars can be pulled from Gaia thus:
from drizzlepac.haputils.astrometric_utils import create_astrometric_catalog

gaia_pm_cat = create_astrometric_catalog(sorted(glob.glob('*flc.fits')))
gaia_pm_cat.write('gaia_pm.cat', overwrite=True, format='ascii.commented_header')
You will want to check the resulting file to see if a decent number of sources were pulled from Gaia. You can also create a region file with WriteReg() to see where these sources lie on the test mosaic. The filename of this reference catalog should be read in as the refcat parameter in tweakreg, with refxcol=0 and refycol=1. If using this catalog method, you will not use refimage while running tweakreg.
Creating a catalog with tweakreg#
It is ill-advised to attempt to use tweakreg to create a catalog, as most machines will crash before the algorithm finishes. If you wish to try anyways, then you would do so by setting writecat = True, expand_refcat = True, and leaving refcat blank for your first tweakreg run. This will create a catalog file called something like cumulative_sky*.coo, which the algorithm fills with sources as tweakreg is running. This file can then be used as the reference catalog for other filters or future tweakreg runs.
If your first pass mosaic isn’t well-aligned and Gaia does not have sufficient sources, you may find that using tweakreg to create a stellar catalog is your only viable option. If you find that the algorithm crashes before the cumulative_sky*.coo file is created, you can try adjusting the parameters (e.g. setting threshold and sigma to a much higher number) and/or reading in only a few FLC files at a time.
Aligning HST Fields with tweakreg#
Once you have the necessary files downloaded and prepared, you can align your HST fields using tweakreg in DrizzlePac. This part MUST be done in command line python, or else you WILL encounter memory issues.
When aligning HST fields, I prefer to align each filter separately. I don’t actually know if this is a required step, but I feel it allows for better control and prevents too much memory to be used up at once. In order to ensure each filter is aligned to one another, you should define a single reference file, which is controlled with the refimage parameter. Since I created test mosaics that were mostly well-aligned, I decided to use one of those as the reference image. If you choose not to use one of the mosaics, then you should opt instead for a field that overlaps with several other fields, if possible, and that has good observations of several bright stars. The same image should be used as the reference file for all fields in all filters.
The star catalog is read in as the refcat parameter, with the column index of the star coordinates read in as the refxcol and refycol parameters (the defaults are 1 and 2, respectively).
Note
Depending on each parameter setting and the computational power of our machine, the code below can be expected to take anywhere from 10 minutes to 2 or more hours. It’s entirely likely that python will crash when expand_refcat=True and writecat=True on most machines. If this is the case, you can use one of the reference catalogs that the code saved before it crashed and read that into refcat, then set expand_refcat=False and writecat=False for the remainder of your tweakreg runs. Alternatively, you can run tweakreg without a reference catalog, though you may find it takes a little longer to find star matches between fields.
from drizzlepac import tweakreg

# Starting with F555W, collecting all F555W FLC files
flc_files = glob.glob("*f555w*_flc.fits")
flc_files.sort()       # Alphabetizing files

reffile = 'testing_mosaic_f555w_drc_sci.fits' # reference file to use on ALL FITS
cat = 'mosaic_catalog.csv'    # or whichever star catalog you chose

# Running alignment
tweakreg.TweakReg(flc_files, refimage=reffile, # only use refimage if catalog is made from reference image
                  imagefindcfg={'threshold':100, 'conv_width':3.5},
                  expand_refcat=False, writecat=False, refcat=cat, # or catalog=cat
                  enforce_user_order=False,
                  fitgeometry='rscale', # allows shift, rotation & rescale
                  minobj=3, sigma=3.0, nclip=3,
                  searchrad=1.0, searchunits='arcseconds',
                  peakmax=70000, interactive=False,
                  shiftfile=True, reusename=True,
                  outshifts='M101_shifts_acs_f555w.txt',
                  updatehdr=False)
The first time you run tweakreg, you’ll want to set updatehdr to False until you’re sure you like the alignment. Depending on your machine, the parameters above may prove too memory-intensive, and the program will crash. You may also find, through trial and error, that tweakreg did not successfully find enough matches for certain HST fields.
The parameters you’ll likely want to change if things don’t go as expected are:
threshold: The object detection threshold above the local background in units of sigma. Decrease to search for fainter objects. However, this increases the computational load of the code, which may result in crashes. If you find your terminal killing yourpythonrun, increasing this number is the first thing you should try.searchrad: Increasing the search radius can help find matches, but this may increase the computational time and result in false matches. (Default is 1)minobj: Decrease minimum number of objects to match when running the fit if not enough matches are found for a field. (Default is 15)sigma: Decrease the source clipping limit if not enough matches are identified. (Default is 3)nclip: Number of clipping iterations to run. Decreasing this can decrease the runtime, preventing your code from crashing. (Default is 3)
For more information on the different parameters, check out the DrizzlePac Handbook.
After a successful run of tweakreg, you should check the shift solutions by pulling some statistics from the shift file:
from astropy.table import Table

shift_table = Table.read('M101_shifts_acs_f555w.txt',
                         format='ascii.no_header',
                         names=['file', 'dx', 'dy', 'rot',
                                'scale', 'xrms', 'yrms'])

formats = ['.2f', '.2f', '.3f', '.5f', '.2f', '.2f']
for i, col in enumerate(shift_table.colnames[1:]):
    shift_table[col].format = formats[i]


print(shift_table)
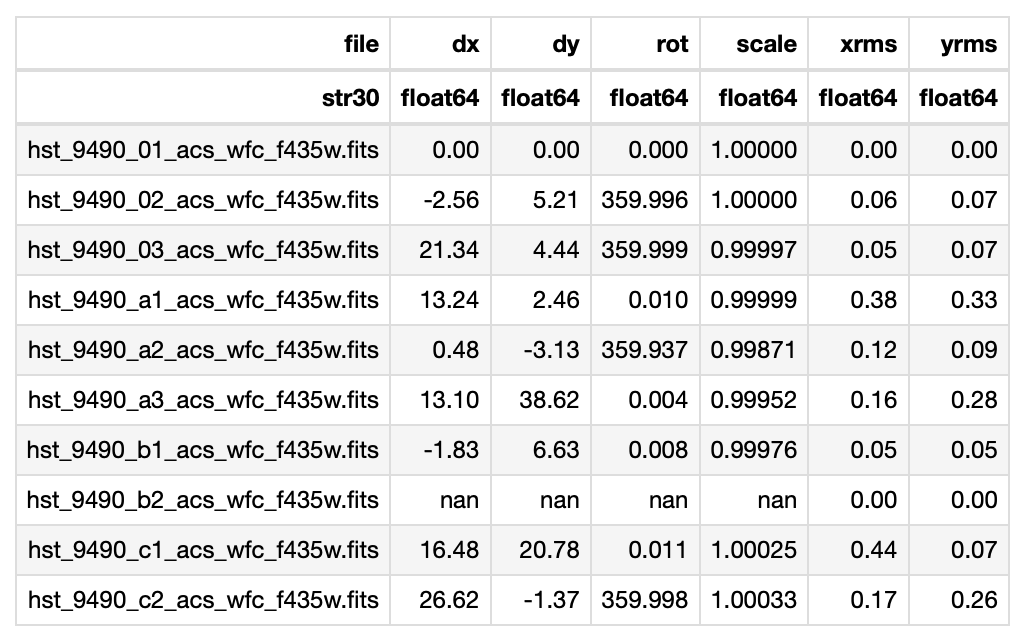
Fig. 4 Example statistics from a run of tweakreg performed on the F435W files. In this case, the shifts are greater than the RMS, but the rotation angles are very small (i.e. likely not significant), so tweakreg should be rerun with fitgeometry='shift'. You can also try fitgeometry='general', if the alignment does not look good after several attempts. Ideally, none of rows will contain NaN values, as this suggests the fitting for that field failed. This may be resolved by decreasing the sigma or threshold values, or possibly by using a different reference star catalog. Note: in this image, the first field was used as the reference field, so no shifts were needed.#
Fig. 4 is an example of a shift table that resulted from a test run of tweakreg. If all values are small, then the fields are already well-aligned and the header does not need to be updated with updatehdr. If dx and dy are smaller than the RMS, but rot is significant, then the fields only need a rotation to be well-aligned. If rot is small, as is the case in Fig. 4, then it is recommended[3] to rerun tweakreg with fitgeometry='shift'. Allowing tweakreg to do a rotational shift when one is not needed can result in distortions in the field images, causing the final product to look blurry in places (see Fig. 5 below), so it’s crucial you choose the correct fitting geometry for your needs!
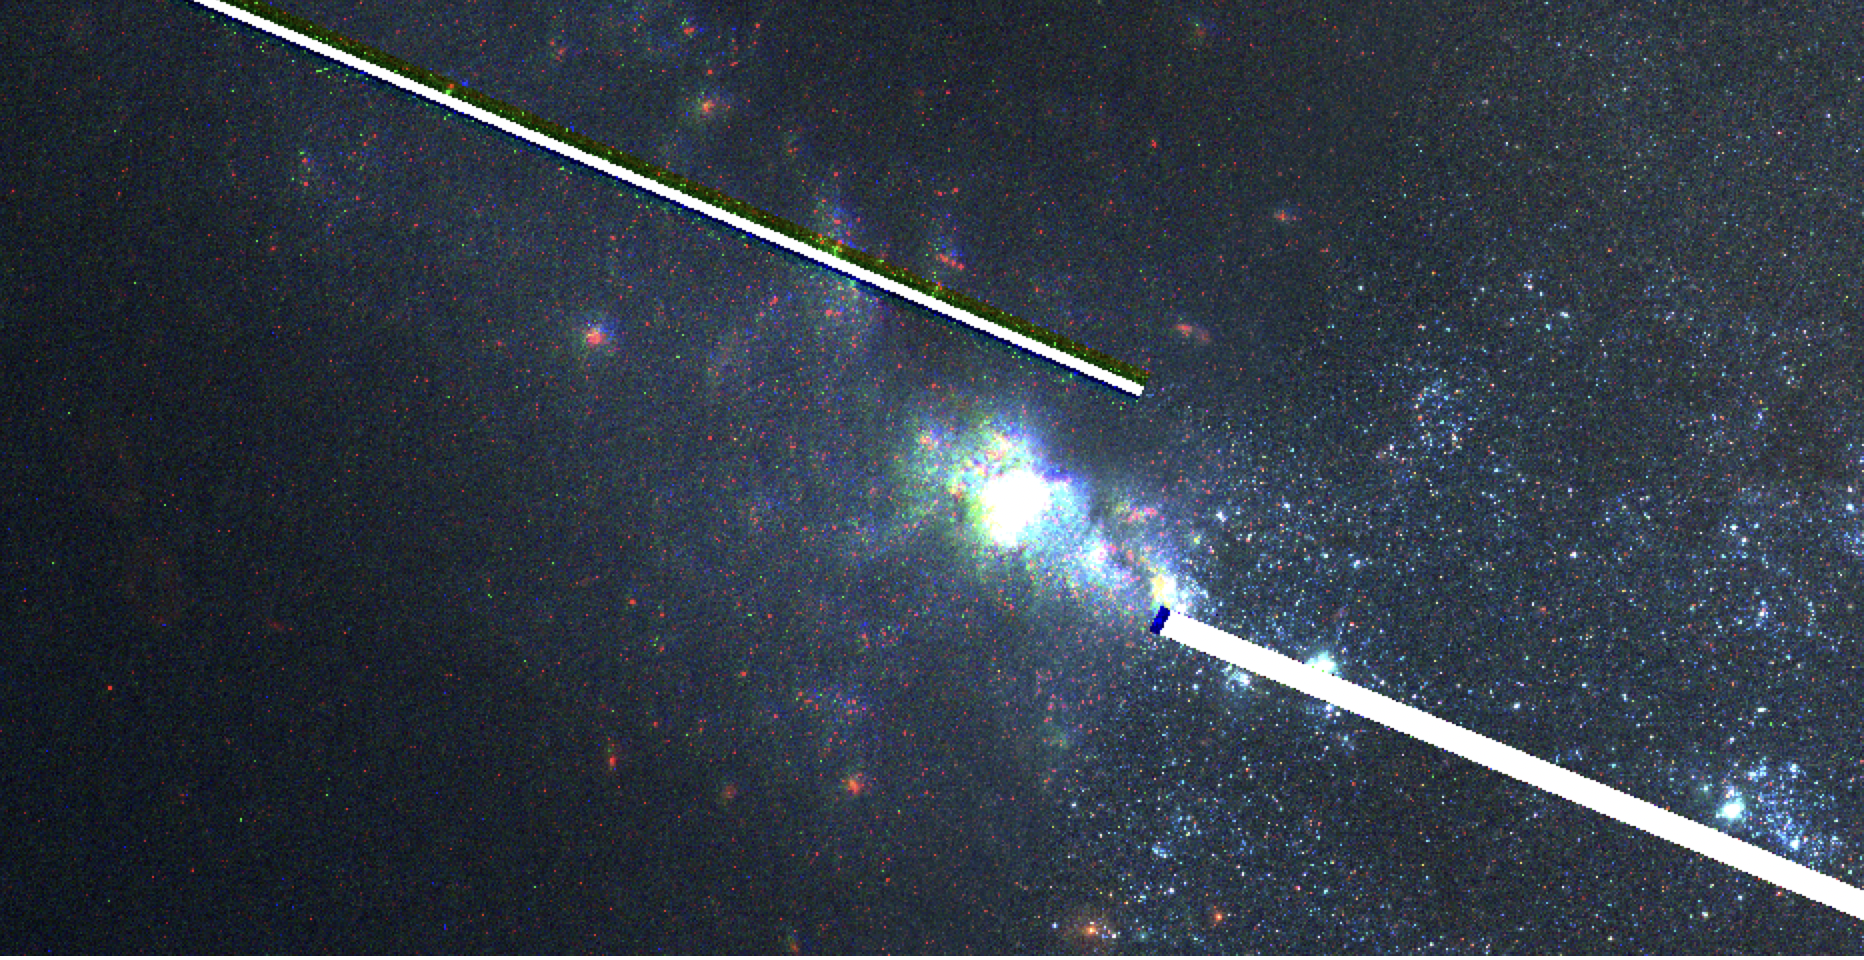
Fig. 5 Example of a mosaic between 2 HST fields created using fitgeometry='rscale' when no rotation is needed (see Fig. 4). Notice how the field on the right is clear, but the field on the left is blurry and misaligned. The blur effect is caused by distortions from rotation and rescaling.#
tweakreg will also save a series of residual images, which you can use to check the individual shifts (see Fig. 6 below). Ideally, the residuals will cluster around zero. A better test, however, is to pull the FITS file up in your image processing software (DS9) and see how they align, which you can do after you apply the alignment as described in Creating Mosaics with AstroDrizzle.
Note
If you aren’t sure whether your alignment is good, it may be beneficial to move on to the next section and create a mosaic anyway! Plotting the full color mosaic in DS9 will tell you a lot about the success of tweakreg. If you find something doesn’t look right, you can always return to this section and try again. The original, unchanged FITS files can be found in a directory called OrIg_files, which tweakreg automatically creates when the header is updated.
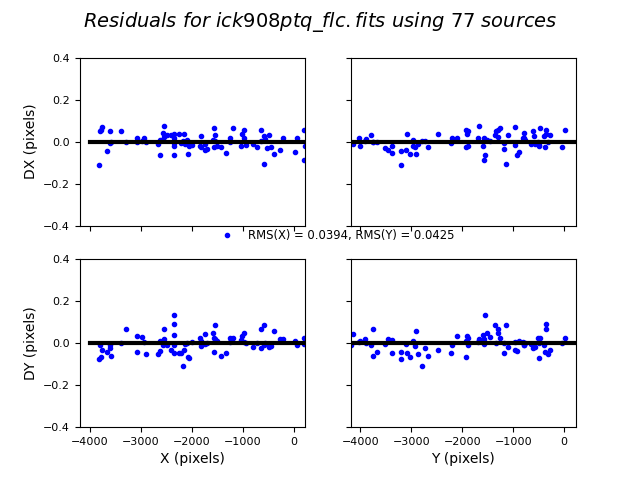
Fig. 6 Example of residuals of a good alignment made by TweakReg. Don’t be alarmed if your plots have a much larger standard deviation, as long as there isn’t a noticeable trend in the points. A visible slope or sine wave may indicate a poor alignment or a bad rotation was applied to a particular field.#
If you like the alignment, then you can rerun tweakreg with savehdr=True. This will save the shifts in the coordinate system to the header of the FITS files. Check your shifts visually with an image processing application. In DS9, this can be done by opening an RGB frame (Frame > New RGB Frame) and opening overlapping fields under each of the 3 filters (make sure you set the scale to zscale in order to see them properly). Check that the stars in their overlapping regions align. Also check if the filters for a single field align with one another, creating a single, coherent color image. If you’re happy with the alignments, move on to the next section. If not, you can try running different parameters through tweakreg until you are.
Creating Mosaics with AstroDrizzle#
One you are satisfied with your alignment, or if you just want to check the full field alignment, you can stitch together each field into a single mosaic using AstroDrizzle. This should be rerun on all filters, to ensure they align properly with one another. Reminder: this step must also be done in command line python!
from drizzlepac.astrodrizzle import AstroDrizzle as adriz

adriz(flc_files, output='M101_mosaic_acs_f555w',
      preserve=True, clean=True, context=False,
      skymethod='globalmin+match', # renormalizes the brightness of each field
      driz_cr=True, driz_cr_corr=False,
      final_wcs=True, final_rot=0,  # places North pointed up
      configobj=None, overwrite=False, build=False)

# Setting build=False will create a separate FITS file with just the
# science data under PRIMARY. If build=True, the science data will be
# saved as a separate extension in the FITS file labeled SCI.
Note
The code above will only align the images based on the WCS headers, which were updated with tweakreg. If you want to align each color mosaic on the pixel level, you must define a final_refimage when calling AstroDrizzle. However, this will limit the final mosaic size to the size of the final_refimage (or, more precisely, the smallest area containing the overlap of all input images), so if you have one filter that covers a wider area than the others, you may find that part of that filter is cut off by AstroDrizzle. If you choose to use final_refimage, select your reference image wisely!
Check the resulting FITS file (here, M101_mosaic_acs_f555w.fits) in DS9. If everything looks good, repeat these steps for each of the other filters, being sure to use the same reference file for all alignments. Using the same reference file should allow AstroDrizzle to align all filters to the same coordinates.
Once all mosaics are complete, check the full color mosaic in DS9 as an RGB frame, playing close attention to how the alignment of each field looks. Remember, you will want to fill the red, green, and blue channels with the filters most closely fitting the visible light spectrum:

In my case, I use F814W as red, F555W as green, and F435W as blue. This results in the following full-color image:
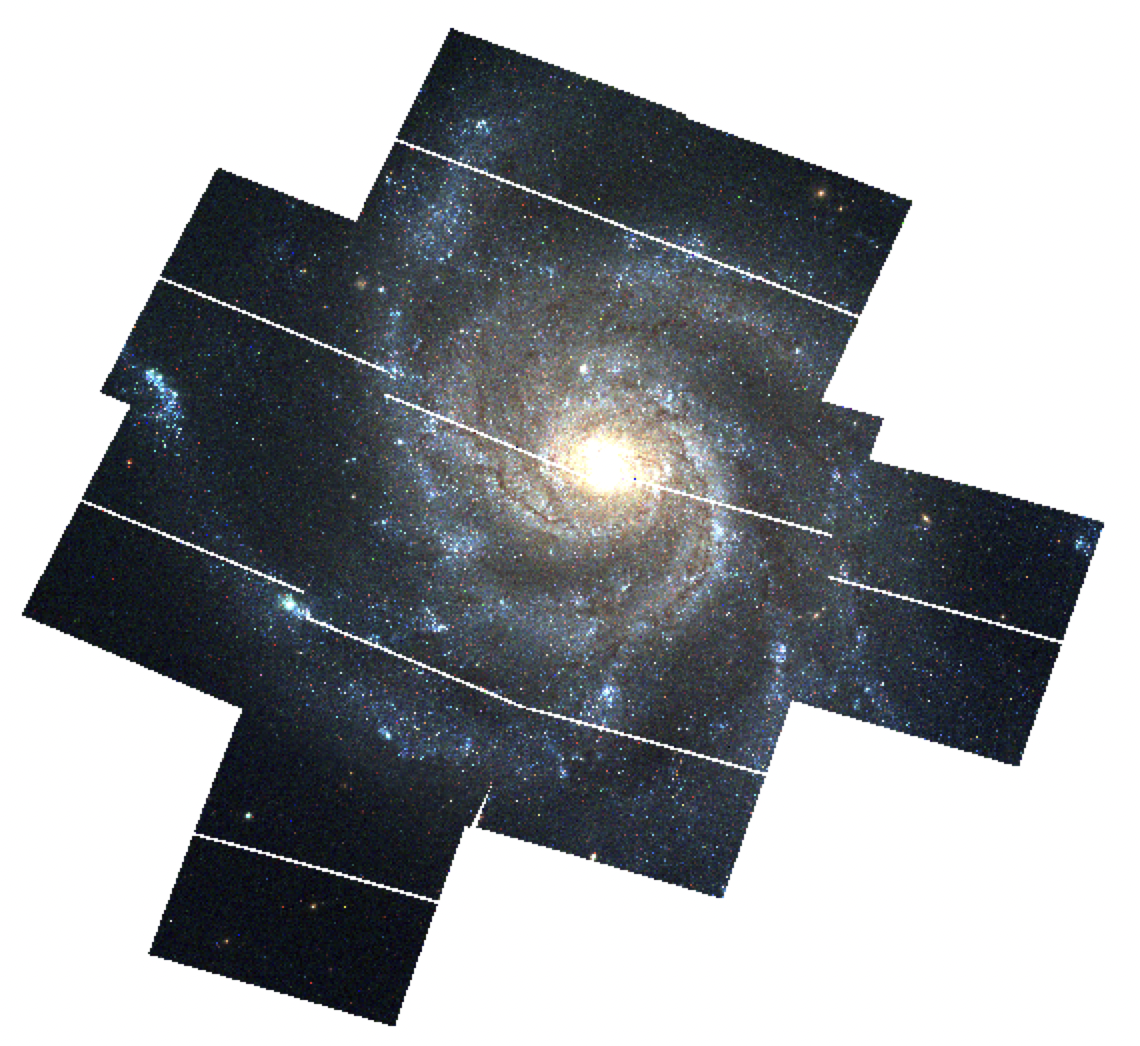
Fig. 7 Full color mosaic of M101 produced by AstroDrizzle.#
Note
You may need to adjust the scale parameters of each filter to make the colors look natural against each other, due to the different intensities and exposure times of each filter. This is done by selecting Scale > Scale Parameters and adjusting the maximum scale (the minimum can usually be set to zero). Typically, the red, green, and blue filters have something close to a 3:2:1 maximum scale ratio. Red will almost always have the highest maximum scale parameter, while blue will almost always have the lowest. In Fig. 7, my maximum RGB scale parameters are 0.5, 0.2, and 0.15, respectively.
What do I do if my mosaic still looks bad?#
The frustrating truth about creating a mosaic is that it’s time consuming and temperamental. Even if you do manage to create one without your terminal killing the process, you may find that there are fields that never look good no matter what you try. Here are a few extra things you can try when you’ve tried everything else.
Visually inspect the FITS files#
Ocassionally one will find HST observations in the archive that aren’t good for science use, possibly due to some sort of issue with the instrument during the observation. These may present themselves as odd streaks, blurs, or similar obvious blemishes. No amount of mosaic tweaking will fix these data.
One sign of a bad observation is if you have multiple observations of the same field under the same proposal ID. For example, the file naming convention of a FLC file will often appear as hst_<propID>_ followed by some number defining the observation of a specific field of the galaxy. If you find the same field has two FLC files in the same filter (e.g. hst_<propID>_01_acs_wfc_f555w_<etc> vs. hst_<propID>_22_acs_wfc3_f555w_<etc>), this may indicate that the field was revisited at a later time due to some issue with the first observation. Open the image in either the HLA or MAST and inspect both of these fields. You may be able to visually detect an issue with one of them, which you can then remove from your FLC file list. You can then try to build the mosaic again to see if that fixed the issue.
Reset your FLC files#
Since the headers in your FITS files may have been overwritten with each shift application, if you find your mosaic is getting progressively worse, it might be a good idea to start fresh. This can be done by copying the FITS files from the OrIg_files folder automatically created by astrodrizzle to archive your FLC files. Also check that your tweakreg and astrodrizzle settings aren’t overwriting the archival FITS files, or you will need to re-download the originals from the archive again.
Run tweakreg interactively#
If there are some fields that are constantly returning NaNs or suspicious shifts during the tweakreg step, you can exert more control over the shift application process by setting updatehdr=True and interactive=True when running tweakreg. This will run the shift calculation and then open three plots: a histogram of calculated offsets and the chosen peak (marked with a red cross), a plot of vectors of the residuals resulting from the shift application, and a scatterplot of residuals along the x- and y-axes. For each FLC file, if the chosen offset peak does not appear well-aligned with the visual peak in the histogram, if the vectors have consistantly large magnitudes, or if the residuals have a visible trend (sinusoidal, a well-defined line offset from or perpendcular to zero, etc.), you may choose to reject the solution. If rejected, the header of that file will not be updated to reflect the calculated shift. This can help avoid blurry fields in the full mosaic, if the solution was bad for only a few files.
Try different combination types in astrodrizzle#
combine_type is a setting in astrodrizzle that defines how the median mosaic image is made. The default is minmed, which is typically only ideal for a small number of fields (4 or less). Other setting options are: median, mean, imedian, imean, and iminmed. For more than 4 images, median is recommended, but if that doesn’t help, you should experiment with other settings.
Tweak the cosmic ray rejection parameters#
Occasionally you’ll find that the cosmic ray rejection mistakenly flags bright globular clusters or foreground stars, due to saturation or other quirks with the image. The default signal-to-noise ratio for the cosmic ray algorithm is driz_cr_snr='3.5 3.0', which is set in astrodrizzle. Increasing these numbers, for example driz_cr_snr='20.0 15.0', can help fix this, though I’ve found changing the combine_type first tends to do a better job. You can also see what happens when driz_cr=False, which can be useful for diagnosing whether problems with your mosaic are due to poor shifts, bad background modeling, or poor cosmic ray rejections.
Give up#
If nothing else works, it might be more time-effective to simply move on. Instead of using the FLC files, you can download the DRZ images for each field of your galaxy from the archive. (In theory, these files should be mosaic-able, but I haven’t been able to get that to work for older HST observations. If you’d like to try, I’d recommend starting by setting updatewcs=False in tweakreg.) If no mosaic can be made, then each step of the data analysis must be done on each DRZ image independently. This is totally fine (and perhaps even more accurate, photometrically speaking), but does increase the analysis time by quite a bit, depending on the number of field files you have for your galaxy.
As a rule of thumb, if you find yourself spending more than a couple of weeks on a single filter mosaic, it may be a good time to consider moving on.